DIY Christmas Ornament: Colorful Pom Poms

Have you gotten your Christmas tree yet? If you’ve gone to the trouble of choosing a sustainable tree, it wouldn’t do to cover it in mass-produced ornaments from the big box store, right? Instead of heading to the mall for your Christmas ornaments, it’s simple and fun to make them yourself. Plus, no one else will have your one-of-a-kind handmade ornaments. Check out our tutorial for making a DIY pom pom Christmas ornament!
Yarn pom poms are super adorable, and they’re a lot of fun to make. Once you get the hang of making your own pom poms, you can put on a good movie, kick back, and churn out enough to cover your tree in adorable yarn creations!
What I love about making pom poms besides the simplicity is the versatility. You can experiment with mixing up different yarns, and you can even branch out beyond yarn. Anything flexible, long, and skinny will work in a pom pom, so you can raid your crafty stash for other fun add-ins like strips of fabric (cut to around 1/4″ to 1/2″ wide), vintage ric rac, and ribbon. Check out these different takes on your basic pom pom:

You can make any of these using this same simple technique below. There are a few ways that you can make a pom pom, but for our purposes, I’m using the hand-wrapping method, which is by far the easiest. Here’s what you’ll need:
Materials
- lots of yarn, or any of the alternative materials described above. I’m using reclaimed acrylic yarn from the thrift store, but you can choose organic yarn, if you prefer.
- scissors. Your sharp fabric scissors will work best for this, since you’ll be doing quite a bit of trimming.
That’s it! Just two supplies to make your pom pom decorations!
Directions
1. Cut a length of yarn that’s about 6″, and set this aside. It doesn’t have to be exact.
2. Grab the rest of your yarn in your dominant hand (if you’re a lefty, you’ll wrap with your left hand), and begin wrapping the yarn around the fingers of your non-dominant hand. Just keep wrapping, until you have a nice, thick layer of yarn on your hand. The more you wrap, the denser your pom pom will be. If your yarn runs out, don’t worry! Just grab another skein and keep wrapping. No need to tie anything off at this point. Just wrap away!

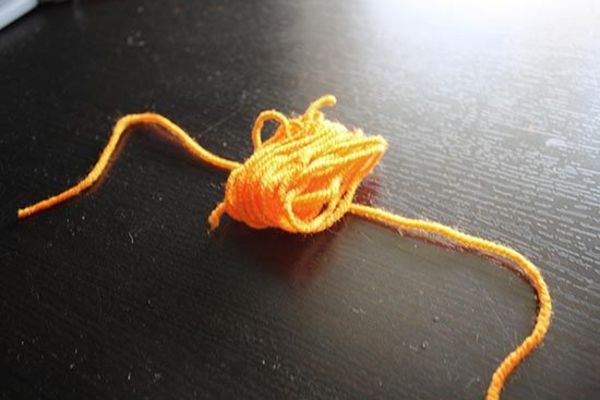
3. Ever so carefully slide your wrapped yarn off of your hand onto the table, and lay that 6″ piece of yarn you set aside underneath it like this:

4. Tie the yarn in a very tight double knot around your yarn bundle, then tie those two loose ends of yarn together in a slip knot. This is the loop you’ll use to hang your ornament.
5. Now, it’s trimming time! See how the yarn is all looped? You want to free those loops by snipping them with your scissors, like this:

6. Just keep snipping until you have a pom pom. Once it’s done, you may need to give it a little haircut, so it’s a nice, even globe of yarn. Trim down any strands that are too long, and you’re ready to hang your pom pom on the tree!
Image Credits: photos by Becky Striepe

