
Seed Tape DIY: 8 Simple Steps to Perfectly Spaced Gardens
Picture this: It’s one of the first sunny, warm days of spring and I’m in my garden doing what I love to do–getting dirty. In my hand I hold tiny lettuce seeds and in my mind I dream of tender baby green salads. Then Mother Nature takes a deep breath and my precious seeds scatter to the wind. Score: Mother Nature, 1; me, 0. This frustrating situation could’ve been avoided if I was only using seed tape.
WTH is seed tape?
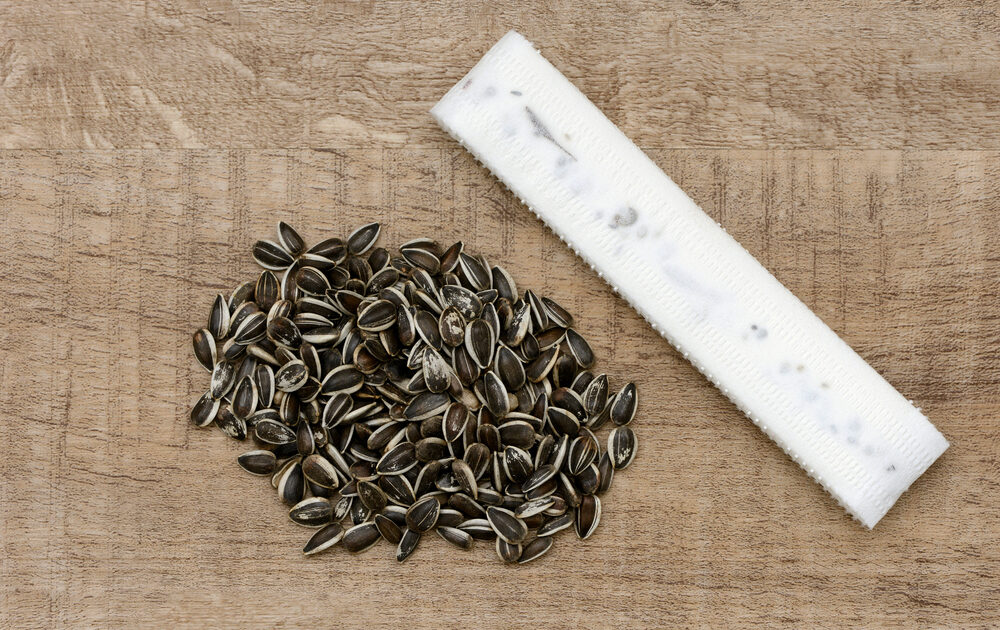
Seed tape is a strip of thin, folded paper (usually 1-2 inches wide) that holds seeds. The tape is planted directly in the ground.
5 benefits of seed tape
1. Makes the handling of small seeds easy. They won’t blow away in a stiff wind (see above) and they are easier to space.
2. Because the seeds are easier to space, there’s no thinning of your plants. Most gardeners can’t help but sow seeds too densely–especially small seeds such as carrots, radish, and lettuce. As the plants begin to grow they need to be thinned once they’re a couple inches high to prevent overcrowding.
Also, by not having to thin the plants, you’ll waste fewer seeds.
3. Perfectly straight rows. OCD gardeners rejoice! By using seed tape you can have compulsively straight rows. Straight rows are especially important for small garden spaces as they optimize the growing space.
4. Making DIY seed tape is a great winter gardening project that gardeners can do during cold months. (It’s been known to cure cabin fever.) Using seed tape can expedite spring planting.
5. Prevents seeds from washing away. Because the seeds are not only protected by the soil but also by the tape, they are less likely to wash away in a rain storm.
8 simple steps to make your own seed tape:
Seed tape can be purchased at almost any place that sells seeds. However, the advantages to making your own is that you aren’t limited to only the seed varieties that are sold at the store, and it’s a fun DIY project.
1. Gather supplies. You’ll need toilet paper (1 or 2 ply) or other thin paper such as newsprint or tissue paper, flour, water, seeds, and a Q-tip or old paint brush. (If you don’t have Q-tips or a paint brush on hand, your finger will work fine.)
Also gather any kiddos who happen to be hanging around. This is a fun, messy, hands-on project that kids are sure to love, and it gets them involved in gardening.
2. Cut TP to desired length and width. The length of your seed tape strip is determined by how long your garden beds are. For example, if your raised beds are five feet long, then your seed tape strip should be five feet long. Don’t worry about this too much because you can always trim the seed tape if it’s too long.
Once your TP is the proper length, cut it lengthwise to make thinner strips. An easy way to do this is to fold the TP in an accordion fold (like you’re making paper dolls) and cut it. This avoids having to cut a straight line that is five feet long.
3. Using a pen, mark seed spacing on the TP. For example, if you’re planting beet seeds, mark every five inches; for carrot seeds, mark every three inches.
4. Make glue. Using equal parts flour and water, mix up a glue that is the consistency of school glue paste or buttercream frosting.
5. Using the Q-tip, paint brush, or your finger tip, dab a chocolate chip sized drop of glue on the TP at each pen mark.
6. Nestle one seed in each drop of glue.
7. Fold the seed tape over on itself. This traps the seeds inside and makes a thinner strip. Here’s where the flour glue comes in handy; it helps the TP stick to itself.
Allow seed tape to dry and label each strip.
8. Once dry, roll up your seed tape and place in a zip top plastic bag. Store it in the fridge. As long as the seed tape isn’t exposed to moisture the seeds will remain dormant and not sprout.
Tips for planting seed tape
Drag the top end of a rake handle (or spade handle) in the soil to make planting rows.
Make sure that all of the seed tape is buried. If an end is sticking out, then a bird may pull on it and unearth your whole strip of tape.
Seed tape can be used in container gardening as well. Trim the strip to fit the width of your planter. Seed tape is a great option for long, narrow window boxes.
Related on Organic Authority
3 Super Easy Steps to Make a Seed Bomb: Rise Up, Guerrilla Gardeners!
Gardeners Beware: Don’t Plant These Monsanto Seeds!
Will Spring Still be Sprung? 5 Tips on Saving Garden Seeds
photo of seeds and seed tape via Shutterstock