3 Easy Tips to Growing and Juicing Your Own Wheatgrass

Fresh wheatgrass is a great way to energize your body in the morning (or any time of day, for that matter) and a good alternative to less healthy stimulants such as caffeine. It increases your metabolism, restores alkalinity to your blood, detoxifies the liver, contains tons of beneficial enzymes and can even help cure illnesses.
That’s awesome, but really, who has time (or money) to run to the juice bar or health food store to get it every time? A much better, more cost-effective way is to grow your own wheatgrass. It’s super easy, fun and satisfying.
Check out these tips to get your own wheatgrass growing:
1. Get a Wheatgrass Growing Kit
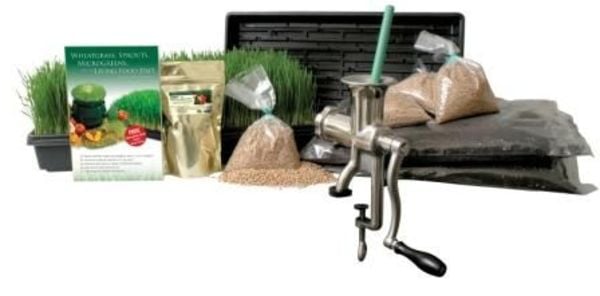
I got mine from wheatgrasskits.com and it comes with everything you need — wheatgrass seed, organic soil, azomite (a natural mineral additive that ensures that your grass contains all of the trace minerals required by the human body), growing trays and thorough instructions. The kit makes up to 90 ounces of wheatgrass juice. For just shy of $37 that’s less than 50 cents an ounce — a really good deal, especially if you consume this stuff on a regular basis.
Also included is Wheatgrass, Sprouts, Microgreens and the Living Food Diet, a complete guide to revitalizing your health using grass juices, sprouts and microgreens. I wish there was a way to tell them you didn’t want the book if you’re a return customer, but I guess you can just start giving those extra books away to friends, encouraging them to join you in your wheatgrass farming pursuits. There are, after all, many different health uses for wheatgrassjuice.

2. Let it Grow
First, you rinse and soak the wheatgrass seeds for about 24 hours. It’s going to seem like it’s too much, but trust the instructions if you want your wheatgrass nice and thick (which you do). Then, you rinse the seeds again and leave them in a bowl without water to sprout, covered with a wet paper towel, for another day. After this, it’s time to put the seeds into your organic growing medium (soil). Lay down an even layer, an inch or so thick, and sprinkle some azomite on top before spreading the seeds on top. Cover with wet paper towels — which you have to keep moist — for 2-3 days and remove only when the grass looks like it’s tall enough to get by on its own. Once it starts growing, it’s fast. The whole process takes about a week.
Easy peasy, right?

3. Making Wheatgrass Juice
Now the final thing you will need is a wheatgrass juicer. I got mine — a manual Hurricane Juicer — from the same place as the growing kit (you can also buy the juicer and the wheatgrass growing kit together, for a slightly discounted price). It’s made from stainless steel and designed specifically to juice wheatgrass and barleygrass (it will juice other fruits and vegetables, just not as efficiently). I love that it’s sturdy and has very few parts to clean, which is a big deal.
Ready to juice? Chop a large handful of wheatgrass off close to the root and go. I had no idea about this, but the wheatgrass will actually grow back and give you a whole second tray — a very pleasant surprise.
If the strong flavor is too much for you, mix your wheatgrass juice with a bit of water to make it go down easier. Don’t forget to toast your good health!
image 1: James Cridland
image 2: wheatgrasskits.com
image 3: Steven Depolo

